

 BLIND COURSES
 CURTAIN COURSES
 CUSHION COURSE


|
Rod Pocket Layout
headrail allowance
fold s
rod 7 fold
rod 6 fold
rod 5 fold
rod 4 fold
rod 3 fold
rod 2 fold
rod 1 Bottom of blind to rod pocket diagram indicative only - not to scale or propotion
|
WHAT YOU NEED TO KNOW IF YOU ARE MAKING: |
SETTING OUT ROD POCKETS: |
PRINT RESULTS
Want to print and keep these results?
If you already have a print access code or a valid Curtain Course or Membership passcode, then enter it here to unlock the print button.No code? Join our newsletter and we’ll email one to you:
Enter your email below to join our newsletter and get a print access code that unlocks printing on this and 4 other calculators.
NewsletterBonus free download

Our Workroom Reference Card
All our curtain and blind allowances in one handy PDF — colour & print versions.
BLIND MAKING RESOURCES: |
|
Courses/Tutorials
Articles
Calculators
Guides
|
This calculator works out fold sections, pleat sizes and rod pocket positions for a cascading (also known as waterfall or stacked) Roman blind (Roman shade) — enter figures in cm or inches.
How to use this Calculator
- Enter the following values in cms (or switch to Inches and fractions if you prefer).
- Finished Blind Length
- Headrail Allowance*
- Bottom flap depth
- Cascade section depth
- Select a number of cascade sections
- Press "Enter" to calculate
- Varying the number of Cascade sections and the cascade increment will change the length of the blind in the up position and the top pleat size.
- Varying the Headrail allowance will also change the length of the blind in the up position and the top pleat size. (Caution: If you make the headrail allowance too small the blind may not pull up properly and if you make it too long the first fold may not have enough fabric to fold and sit right * )
- The ROD POCKET LAYOUT section below will produce a diagram showing the rod pocket positions
* Please see our ARTICLE Headrail allowance explained for more information on headrail allowances.
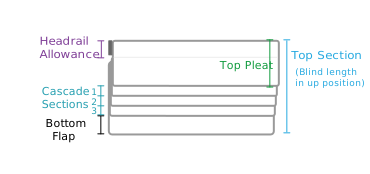
The bottom flap can be varied in length to your design requirements or made the same size as the cascade increment .
Free download
Our Workroom Reference Card
Save time at the cutting table with all our curtain and blind allowances in one handy PDF. (colour, print & cm/inch versions)
Calculator print unlock
Unlock printing on this and 4 other free calculators — we'll email you the code.
Join our newsletter for your
We never share your information with third parties.


